
Screen, webcam and sketchboard recorder with an integrated editor.
License: Microsoft Public License
Available in a portable version!
Screen, webcam and sketchboard recorder with an integrated editor.
License: Microsoft Public License
Available in a portable version!
Microsoft PowerToys is a set of utilities which are usefull for power users.
Microsoft PowerToys | Microsoft Learn
License Type: MIT
Some of the functions offered by PowerToys which could be usefull:
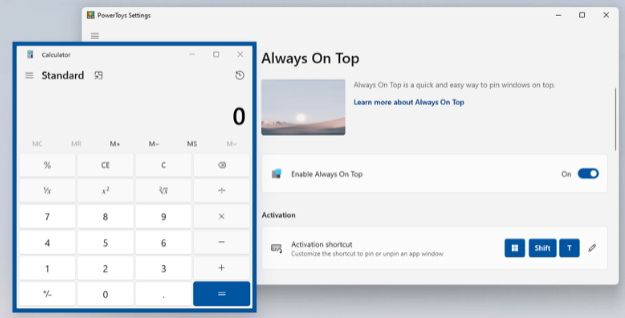
Allows you to force an application to always be shown in the foreground, even when the focus changes to another windows.

Tool which can be used to quickly figure out what color is used for a specific pixel on the screen.
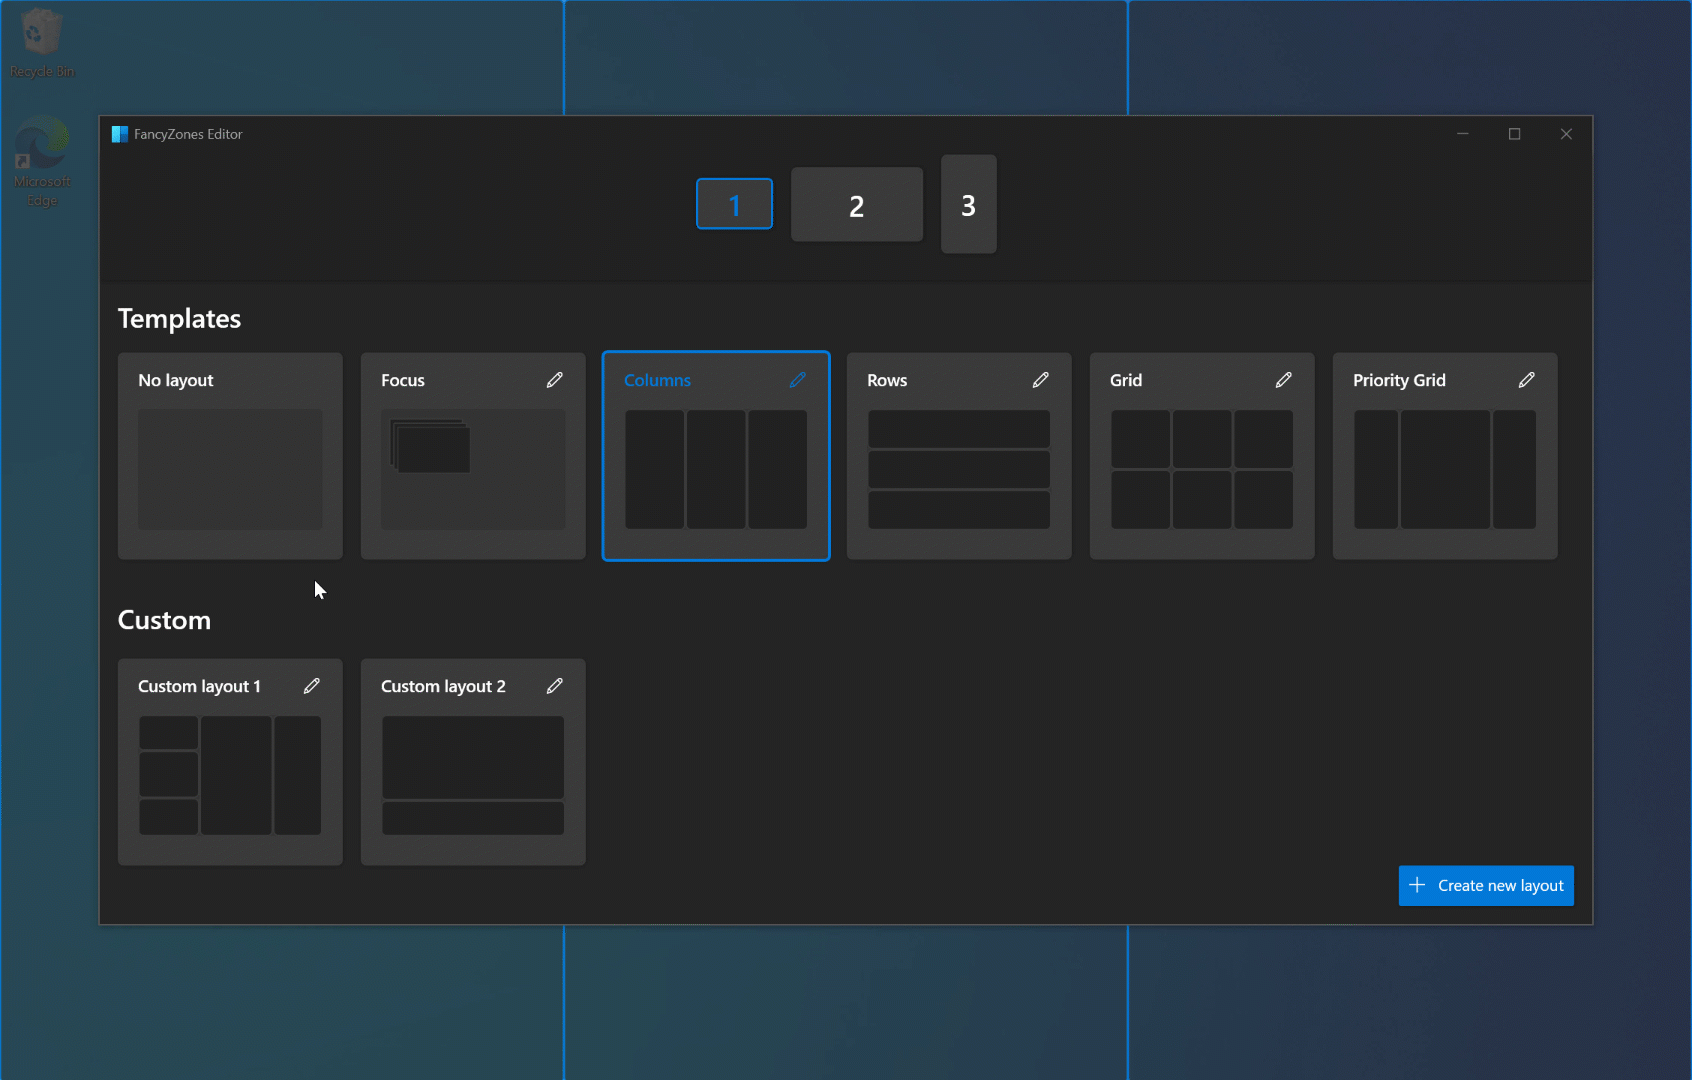
This is a window manager which I personally use alot as I sometimes feel limited to the number of snap points which are available in Windows by default.
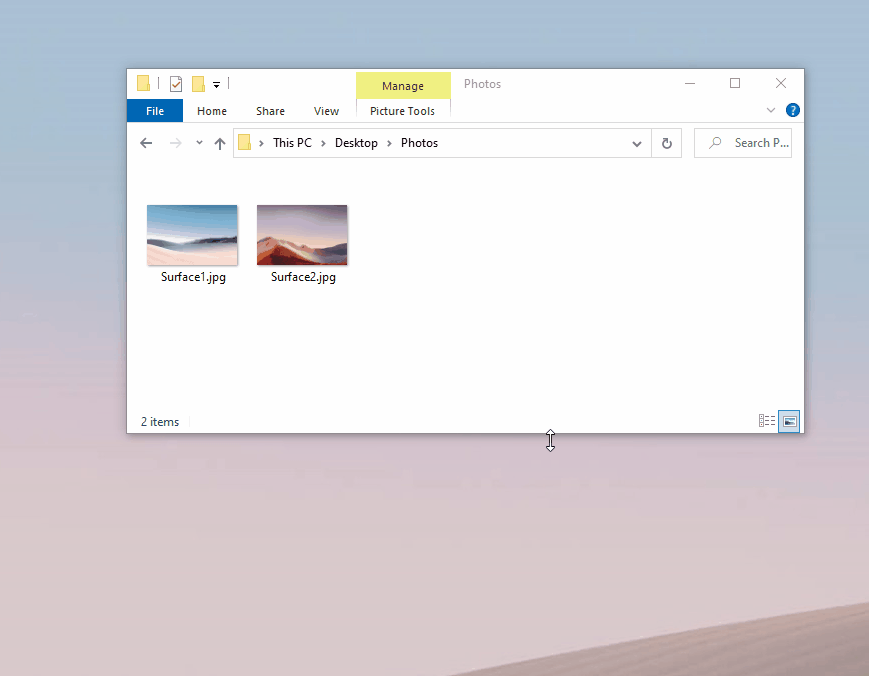
Useful tool to bulk resize images.


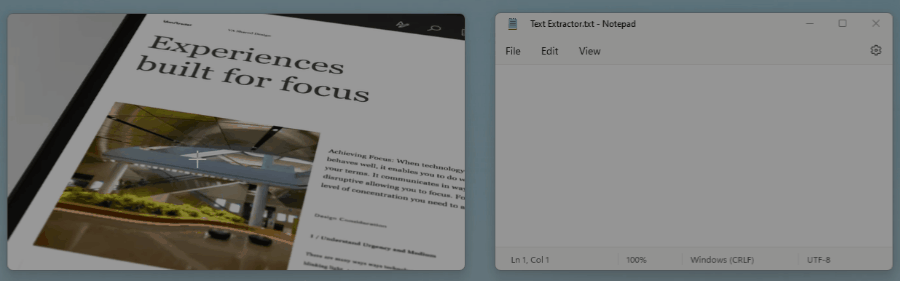
Works like Snipping Tool, but copies the text out of the selected region using OCR and puts it on the clipboard.
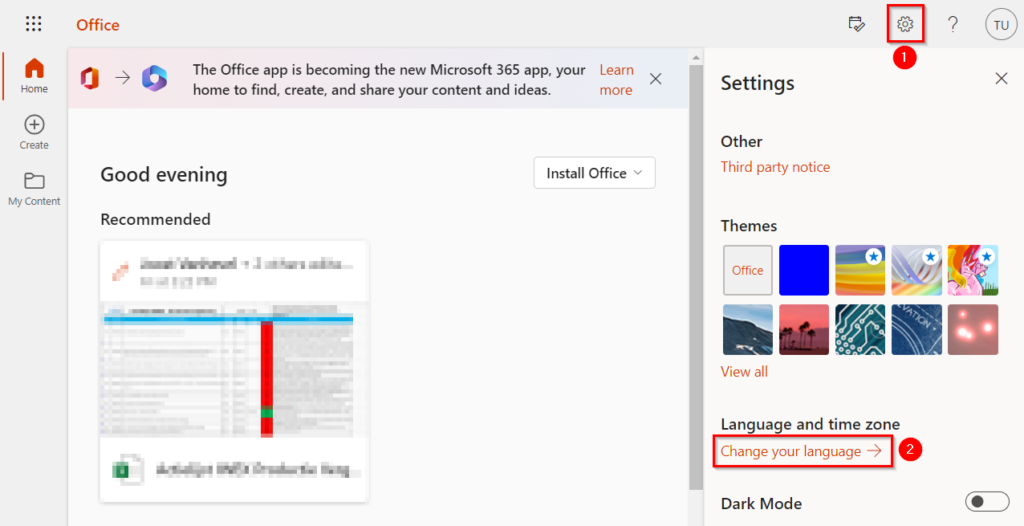
In a cloud environment, you can change your display language on Microsoft 365 (https://www.office.com) when you click on the gear icon on the top right of the page, and then selecting “Change your language”.
For users in a Hybrid environment, the possibility to chose the display language is greyed out.
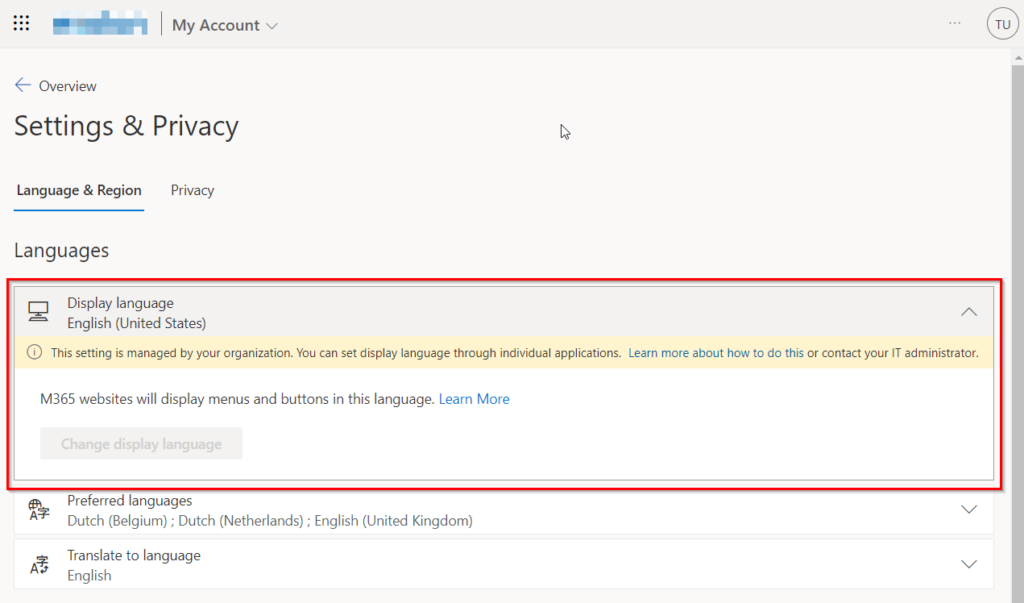
In order to change the Display language, the user needs to contact the administrator of his organisation, which can then change the language to the preferred language in Active Directory.
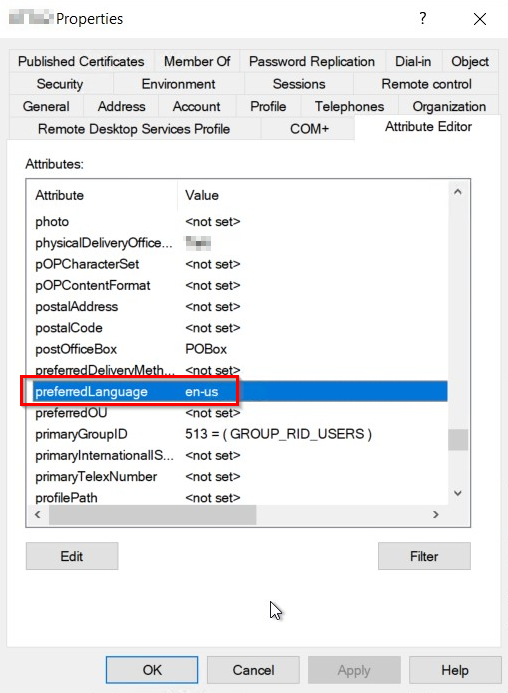
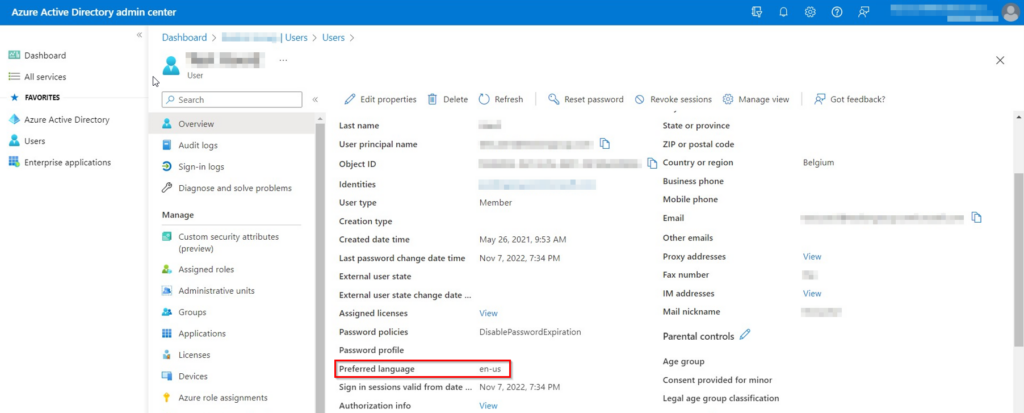
The administrator needs to change the attribute “preferredLanguage” to the preferred language code under the users properties (Attribute Editor), in Active Directory Users and Computers.
After setting this value to the prefered value, it will take some time before this value is synced to Azure Active Directory, and take effect for the user in Office.com.
To speed up this proces, you can trigger a Delta sync from the server which contains the “Azure AD Connect” application.
Open a elevated Powershell Prompt on that machine, and type in the following code:
Start-ADSyncSyncCycle -PolicyType Delta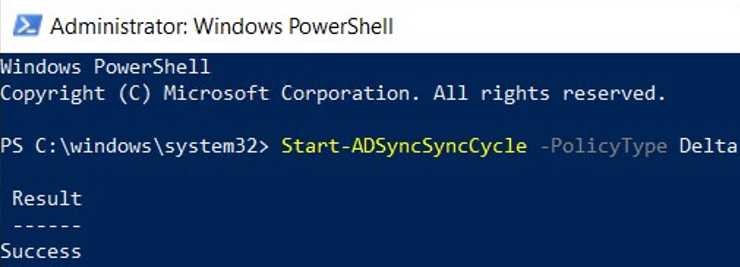
Once the sync is completed, you should see the same value as you set under “preferedLanguage” in the properties of the user in Active Directory, appear in the Azure Active Directory admin center in “Overview” – “Properties”:
Next time the user in question logs in on Office.com, the language should be changed to the set value.
mattiasvdlbe/Azure Active Directory/UpdateUserData
After updating the user data of a big list of users in Active Directory, we noticed the Usage Location was not updated in Azure Active Directory.
For this I created another script which goes over the same .csv file as the script did which updated the AD information.
See my post about the script which I created to update the Active Directory User data.
This script loads in the same .csv file and loops over all users in the file and updates the necessary fields.
mattiasvdlbe/Active Directory/UpdateUserData
I had to make a bulk update of data for a list of users, and instead of opening each user profile one by one and changing the values, I decided to write a script which could do this in bulk for me. It saved me a lot of time and avoided typing and other user errors.
I only needed to make sure the input csv was set up correctly.
I started of with an export of all necessary fields from the Active directory, made this a bit more readable for the people responsible for determining the data which needs to be updated, and provided the file to them for correction of the data.
When I received the file back, I made sure all necessary data was filled in, generated the necessary codes for the countries, and generate the .csv file this script needs to make the updates.
This script loads in the .csv file and loops over all users in the file and updates the necessary fields.
List of ISO 3166 country codes – Wikipedia
mattiasvdlbe/MS Endpoint Manager/Proactive Remediations/PR_U_EnablePrtScrSnippingTool
The Windows Snipping tool is a very useful tool to quickly make print screen of specific parts of your screen.
The ability to start the application by clicking on the print screen button on your keyboard instead of having to open the program manually can save you time and is just a big convenience.
In the windows settings, you can manually enable this setting, but I’ve created a script so this functionality can be pushed to the devices of the end users without manual action.
This saves me or the end user having to remember to turn this setting on after they start using a newly rolled out device.
This script checks if this function is enabled.
In the settings of Windows, you can find this setting here:
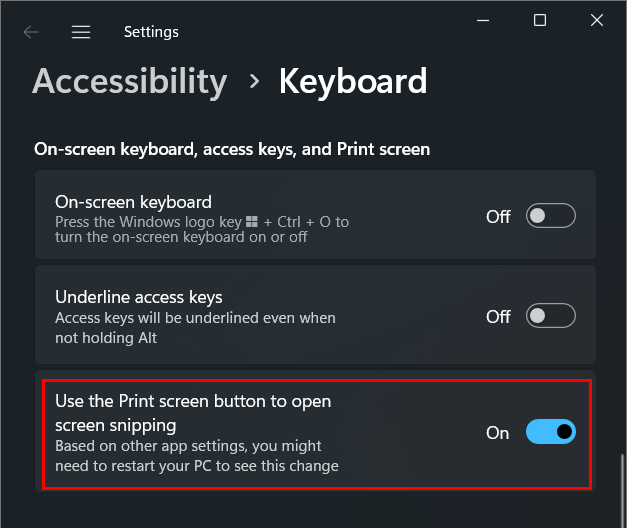
In case this option isn’t enabled yet, the remediation is triggered which will enable this function.
It also creates a log with some text outputs which are specified in the script.
For this, it uses an implemented function called “Write-Log()”
If you want to use this script, don’t forget to change the log output path.
mattiasvdlbe/MS Endpoint Manager/Proactive Remediations/PR_S_TimeAndDateCorrection
Some time ago, we had some devices which were no longer running on the correct time.
On the devices in question the users didn’t have administrator permissions, so they couldn’t change the time and date themselves.
As the end users needed to be able to continue their work as soon as possible, and the issue wasn’t widespread, we decided to just create a small script to fix the issue.
The script shared in this post, is more advanced, and has more options.
If you want to use it, check if all things checked and set in this script are relevant in your case.
This script does some checks to make sure the end user device is using the correct date and time.
Things the proactive remediation checks:
In case any of these checks fails, the remediation gets triggered, which then puts the system back to our desired configuration.
It also creates a log with some text outputs which are specified in the script.
For this, it uses an implemented function called “Write-Log()”
If you want to use this script, don’t forget to change the log output path.
Other functions which are implemented: